May 11th, 2026
Improved
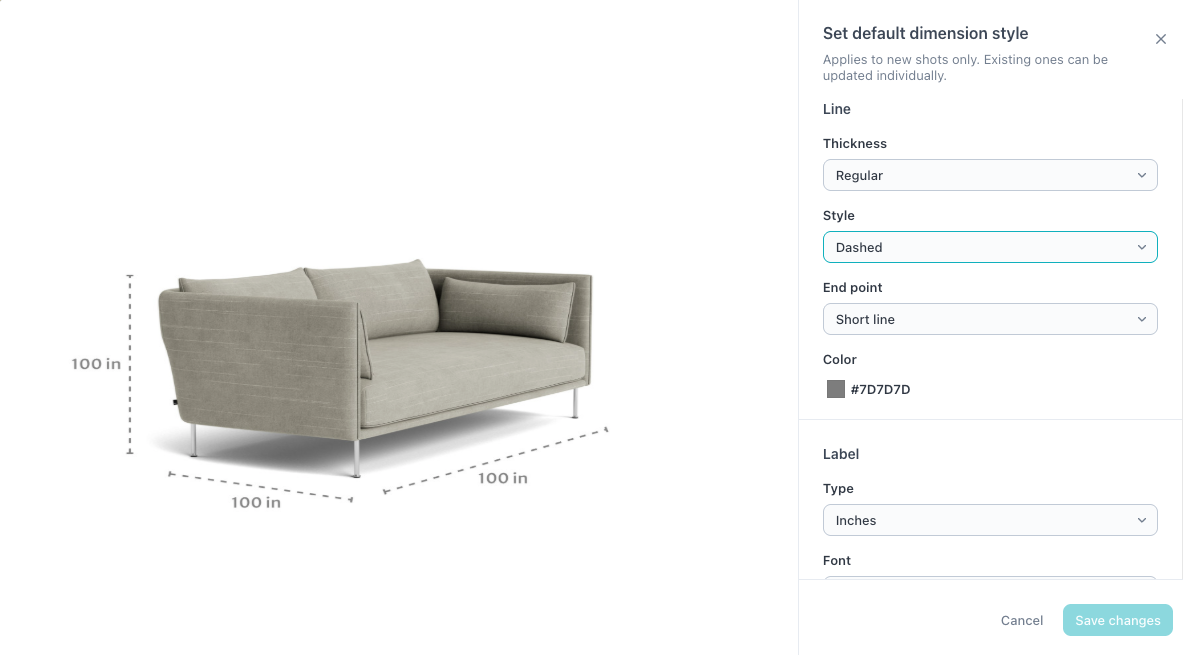
Control the look of your dimension imagery — colors, fonts, line weight, and style — directly in the CMS.
What is it
You can now adjust colors, fonts, line weight, and overall style on every line, directly inside the Dimension Shots tool. Apply styling line by line, or set defaults that automatically apply across everything you create.
Why it matters
Dimension imagery is part of your product experience and now its truly part of your brand. No Photoshopping, no back-and-forth, no extra cost — and the styling stays consistent across every product you publish.
How it works
• Open any dimension line in the Dimension Shots tool and adjust its color, font, line weight, and style
• To apply your styling across the catalog automatically, head to Manage Styles and set your brand defaults
• Every new dimension line you create inherits the global styling — one setup, applied everywhere
• Updates are live the moment you save — no publishing step, no waiting
Available now —> We recommend setting your global styles first so every new line you create stays on-brand by default.
May 8th, 2026
Improved
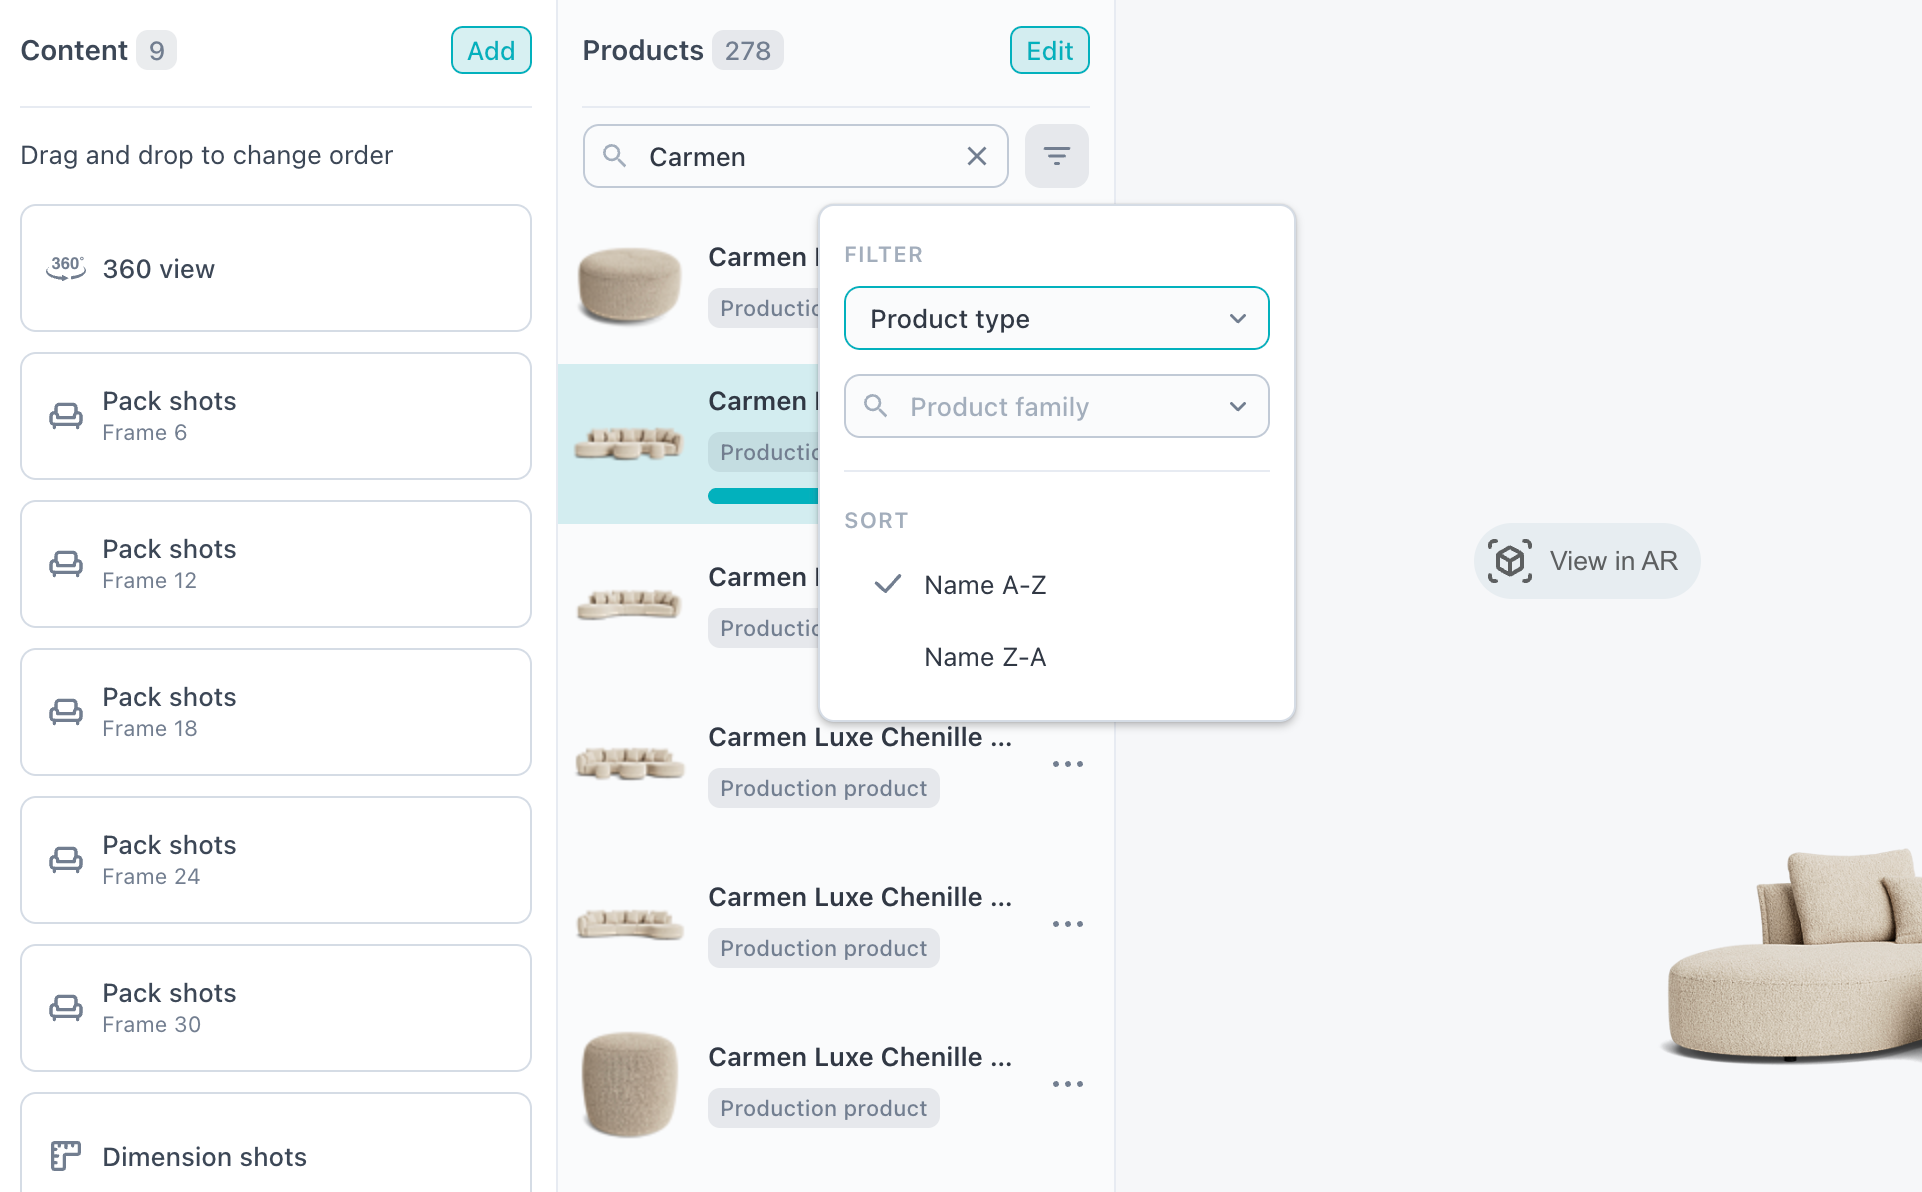
The Curator product list has been updated with faster performance and a new set of discovery tools. You can now search by name, filter by product type and product family, and sort results A-Z or Z-A, making it easier to find and manage products across large catalogs.
April 15th, 2025
New

What is it?
Modular Designer is a new add-on product in the Cylindo ecosystem that allows you to create interactive, 3D product configurators.
Cylindo Modular Designer is our new 3D configuration experience that brings modular product visualization directly into the Cylindo platform. With support for Modular Configurators, Generators, and Set Builders, this feature empowers customers to design products and bundled sets dynamically—right from your product page.
Whether it’s a sectional sofa, a customizable storage system, or a mix-and-match dining set, Modular Designer bridges the gap between product listings and real-world configurations.
Why it matters?
Static imagery views are powerful (and we’ve got the industry’s best). But when you're working with multi-component products, static scenes alone can’t scale. You’d need thousands of pre-renders just to show every combination. Modular Designer solves that.
Shopping for modular products online has traditionally relied on static images and imagination. This results in:
Hesitation at checkout
Confusion over how pieces work together
Limited visual context
With Modular Designer, you can:
📈 Increase buyer confidence and reduce returns
💰 Drive higher order values through bundled purchases
🛠️ Streamline custom orders with real-time visuals, pricing, and more
💡 Equip sales teams and in-store associates with a guided selling tool
How it works?
Modular Designer is available directly within the Cylindo platform and supports:
Modular Configurators – Click-and-place modules to build customized layouts
Generators – Select from preset options like fabric, color, and dimensions to auto-generate configurations
Set Builders – Combine different product families into unified scenes
Available as both a hosted solution and via iFrame, the designer integrates with your e-commerce stack to enable pricing, cart functionality, BOM, localization, and more.
➡️ To learn how to enable it for your products, reach out to your CSM today.
April 10th, 2025
Improved
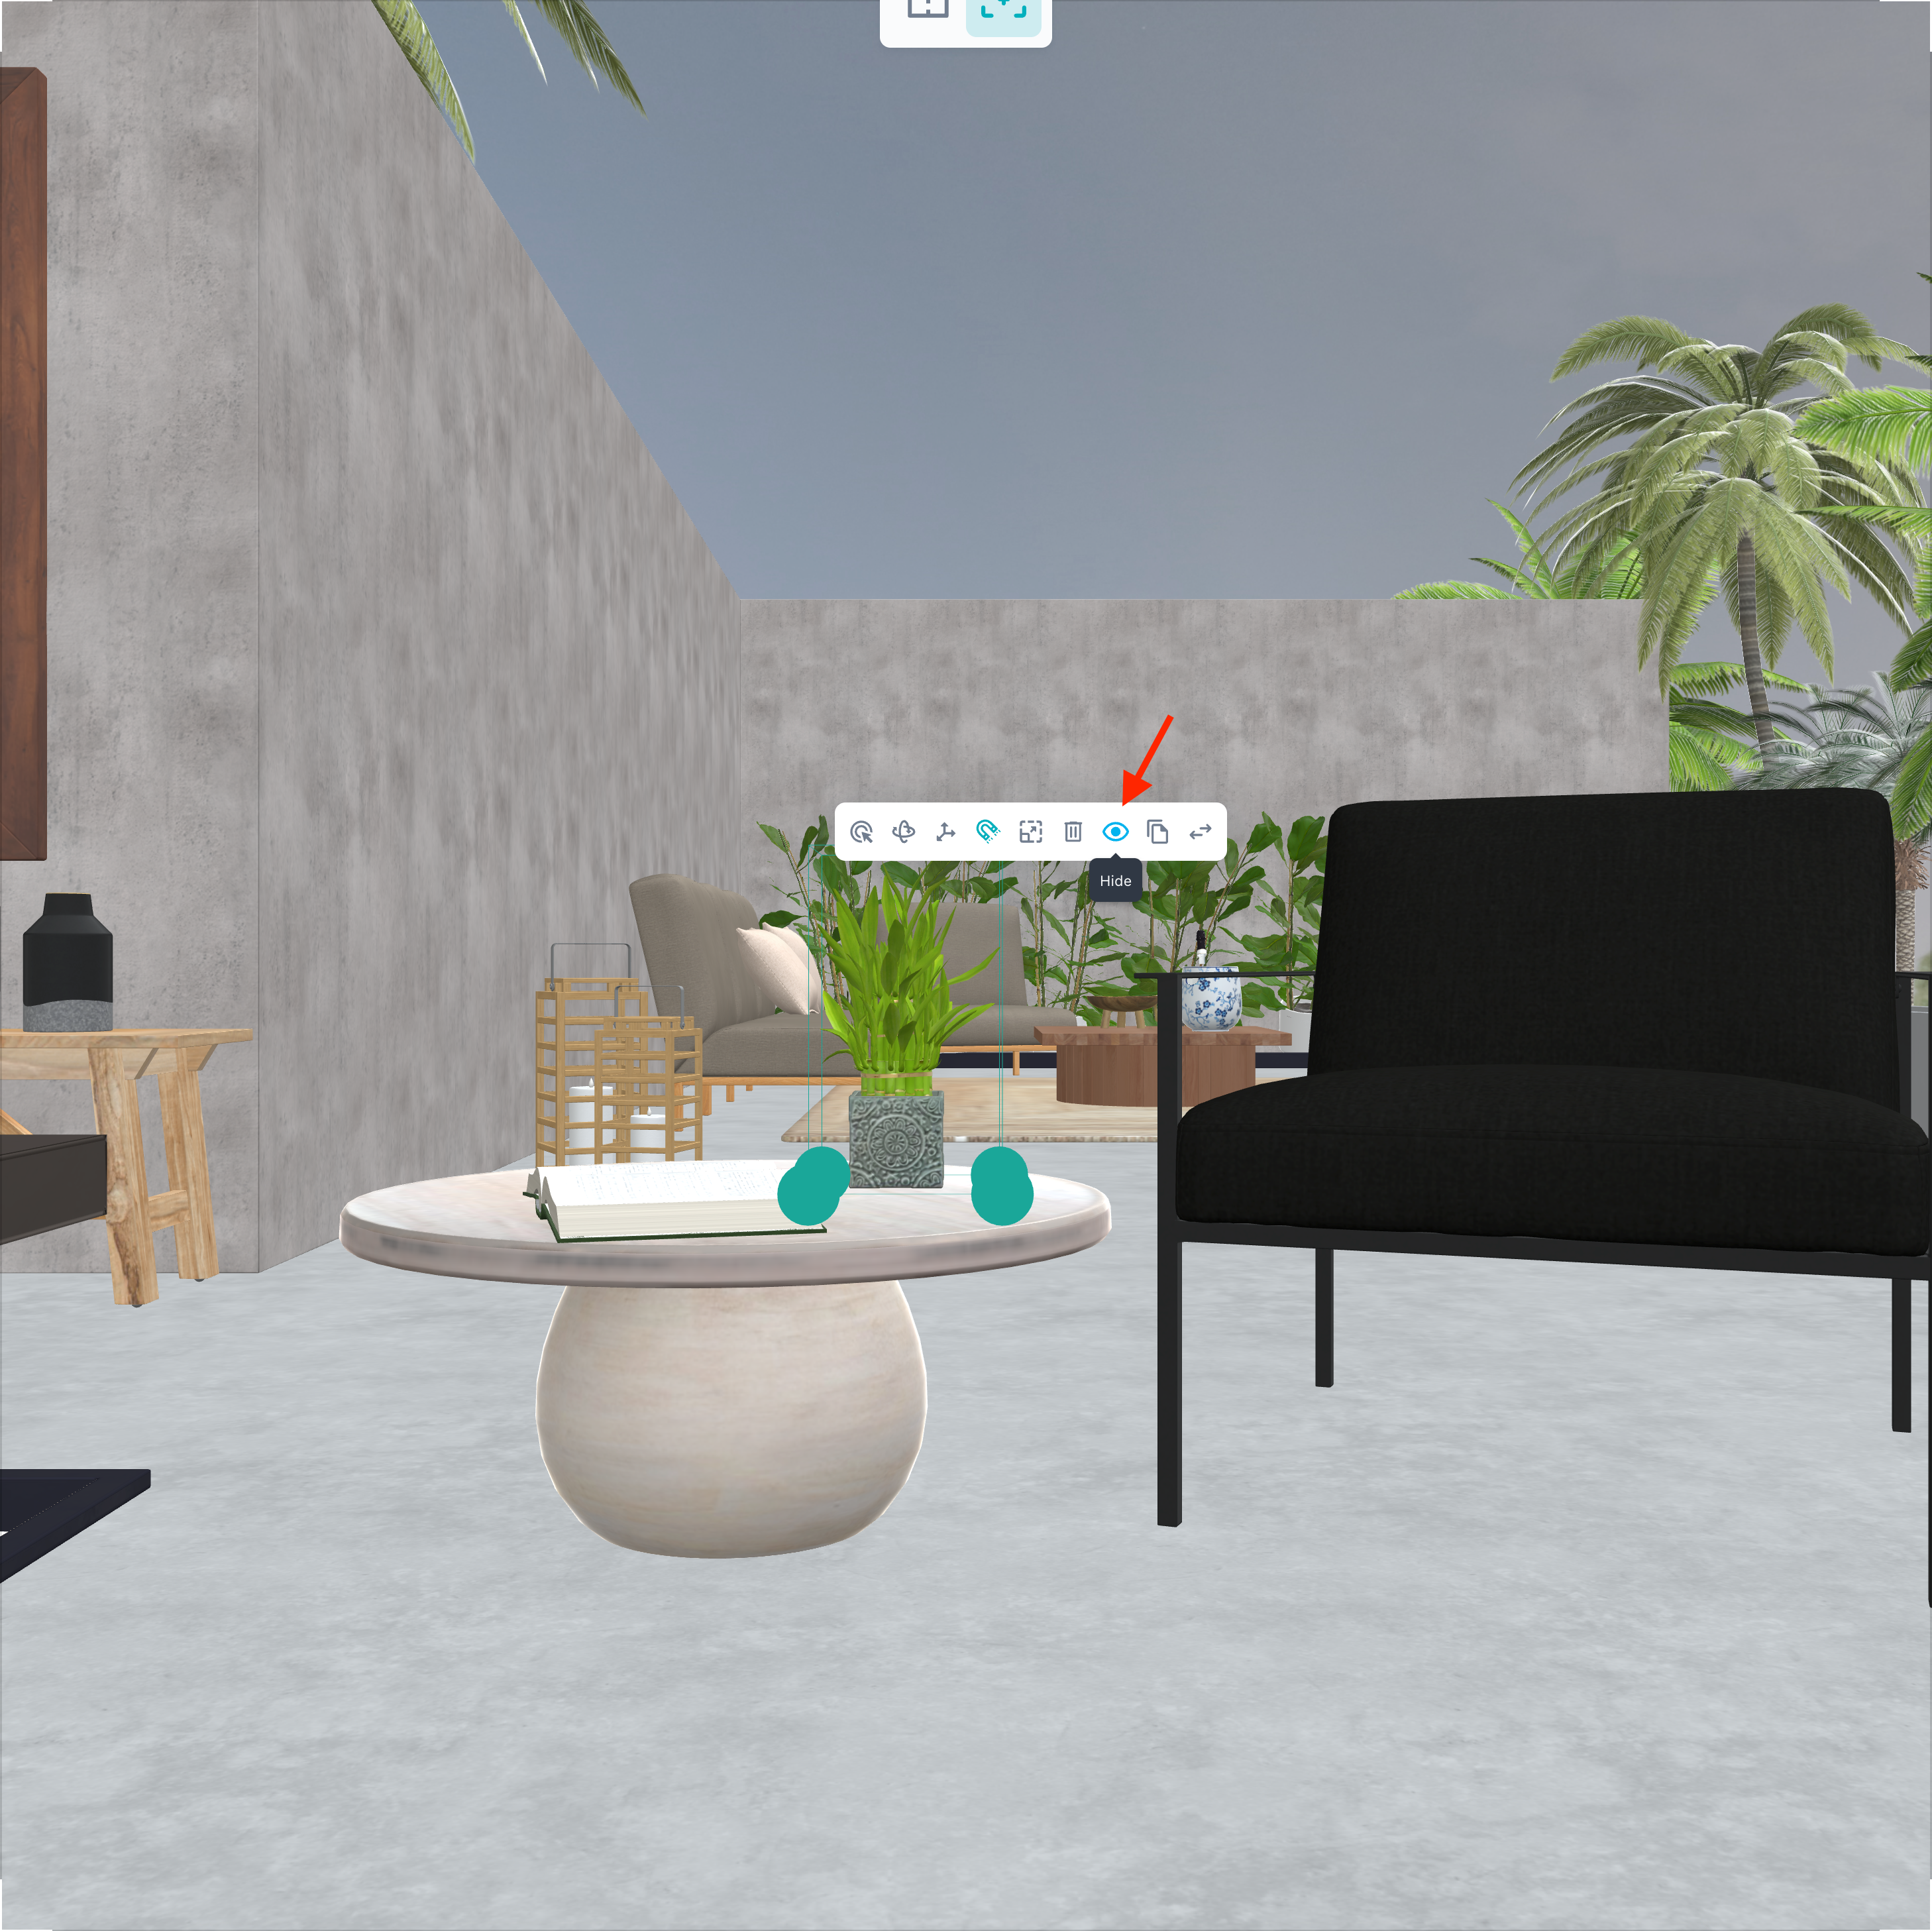
Temporarily hide props without deleting them! Toggle visibility with a single click in the side panel or toolbar.
Hidden props still shown in the sidebar for easy tracking
Feature only affects props and custom props
Hidden props are hidden from Live render previews and final renders
February 27th, 2025
New
What is it?
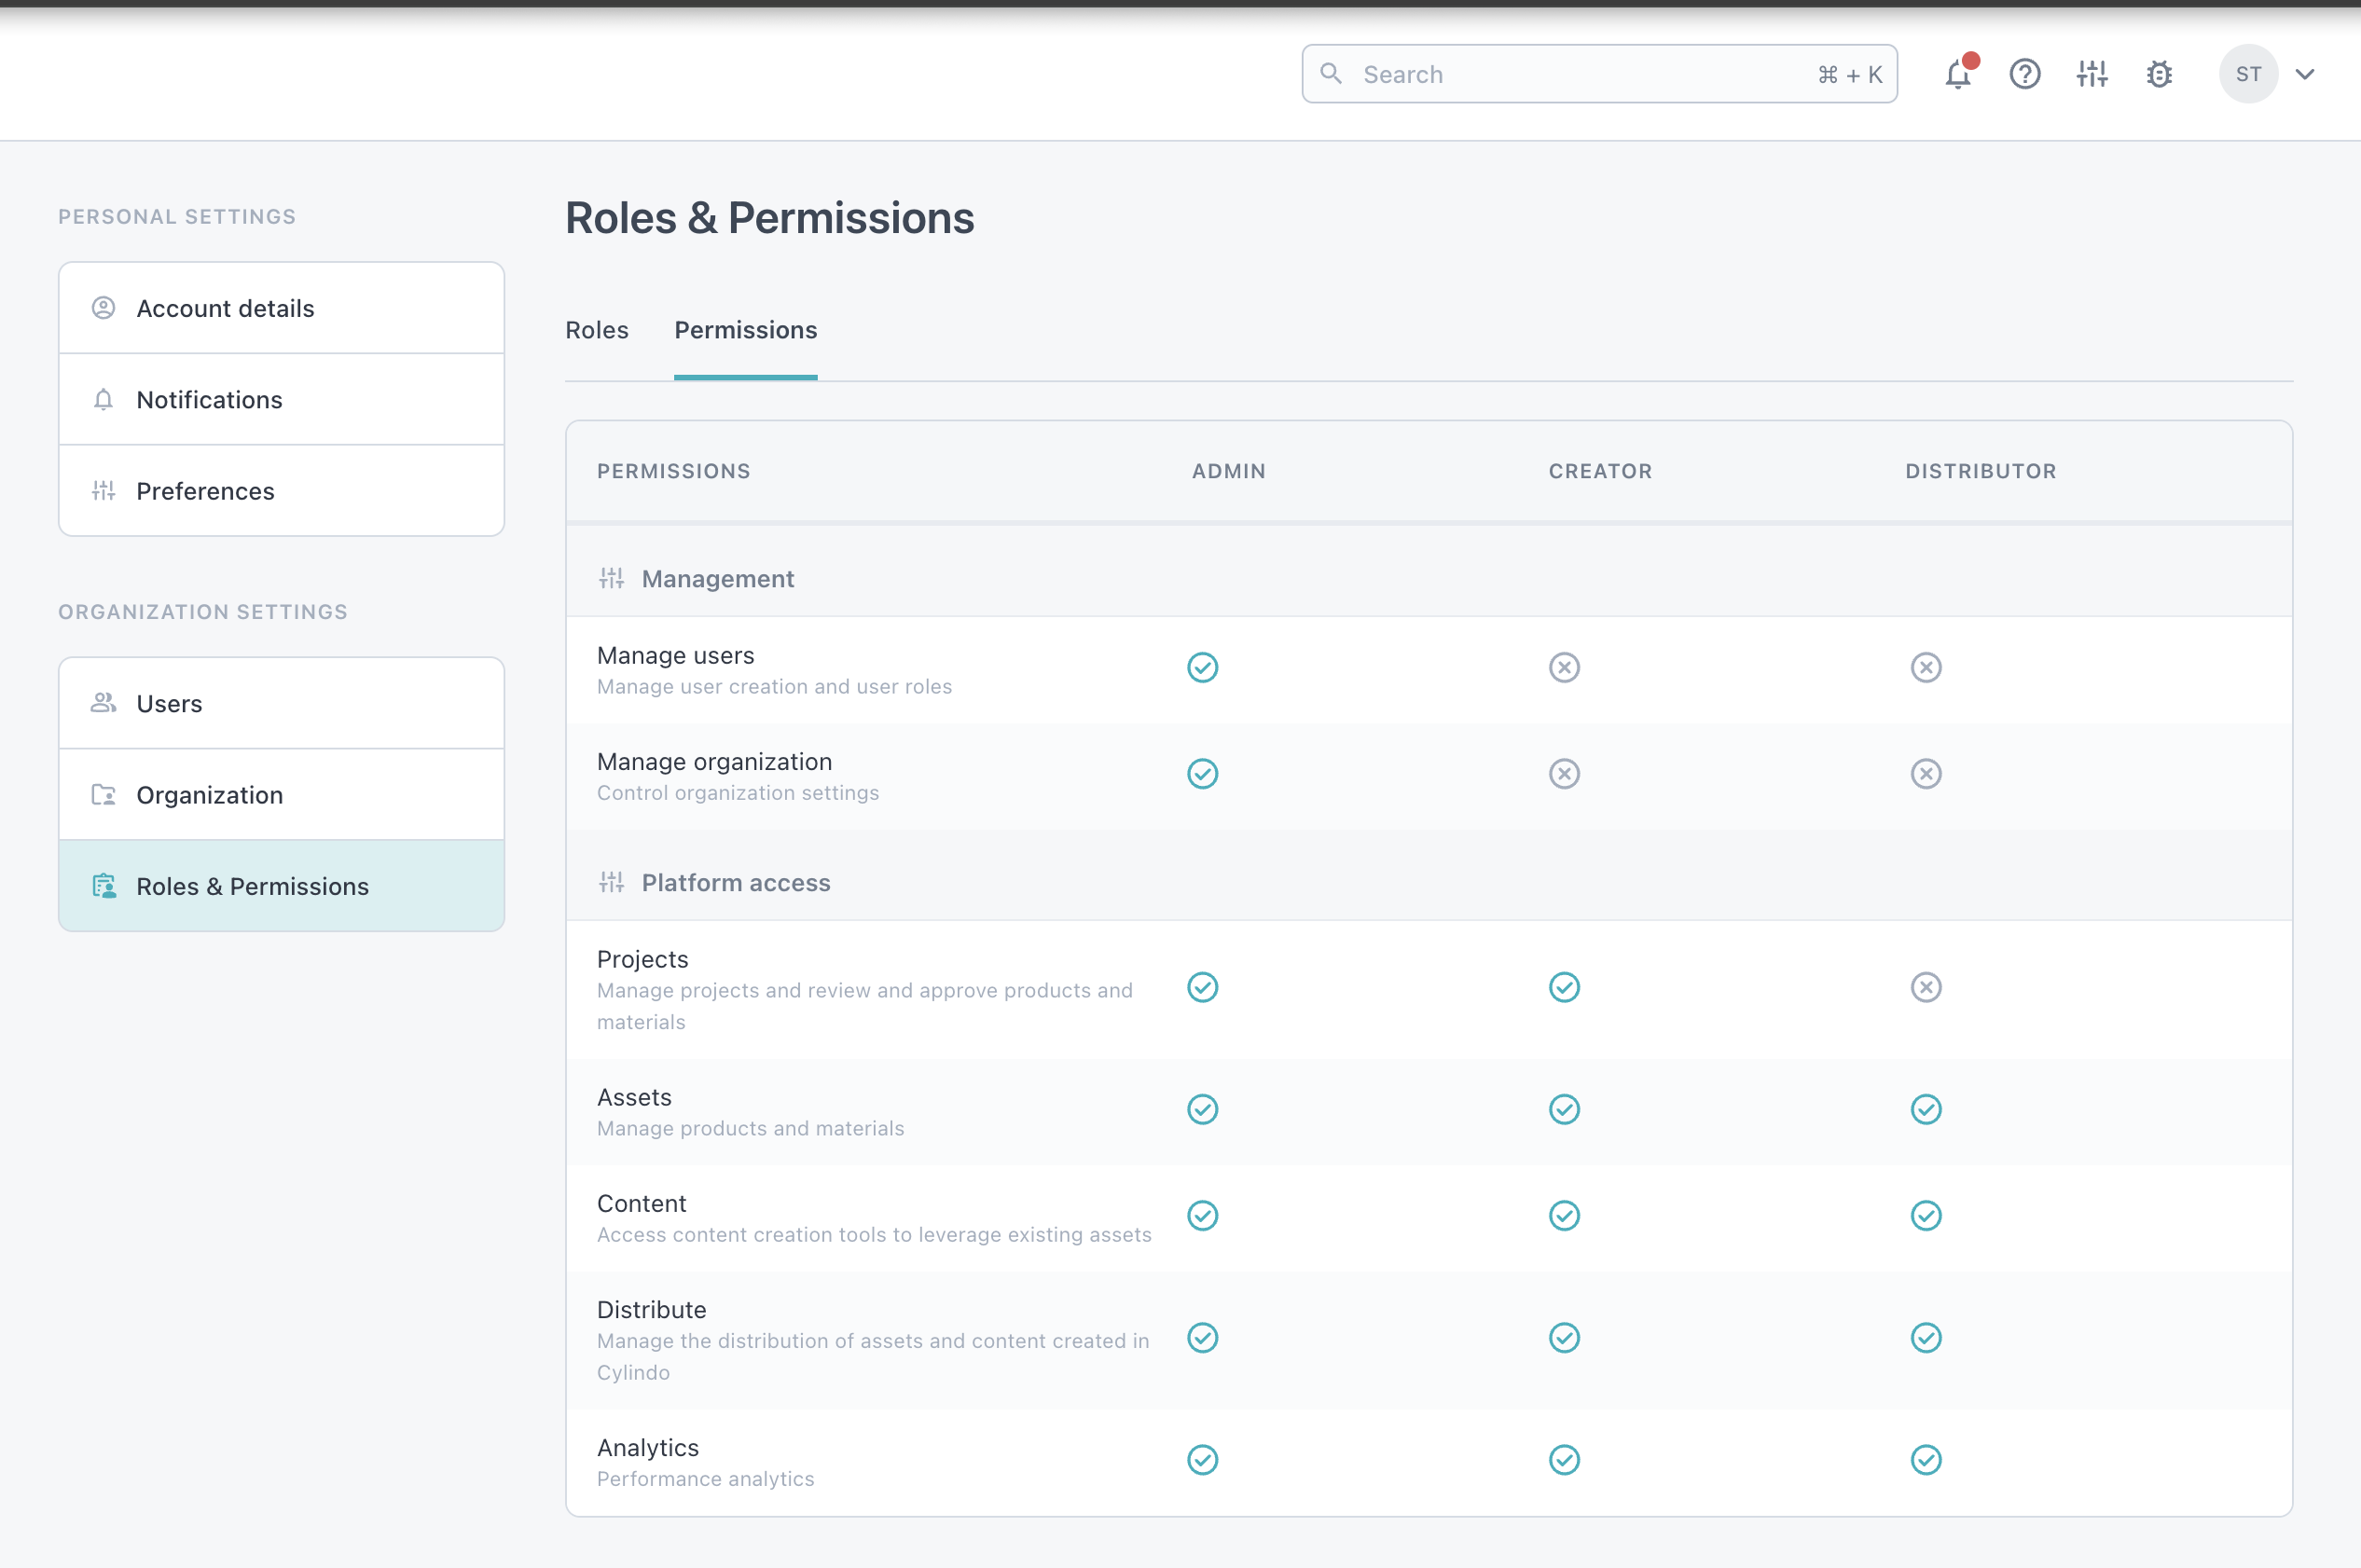
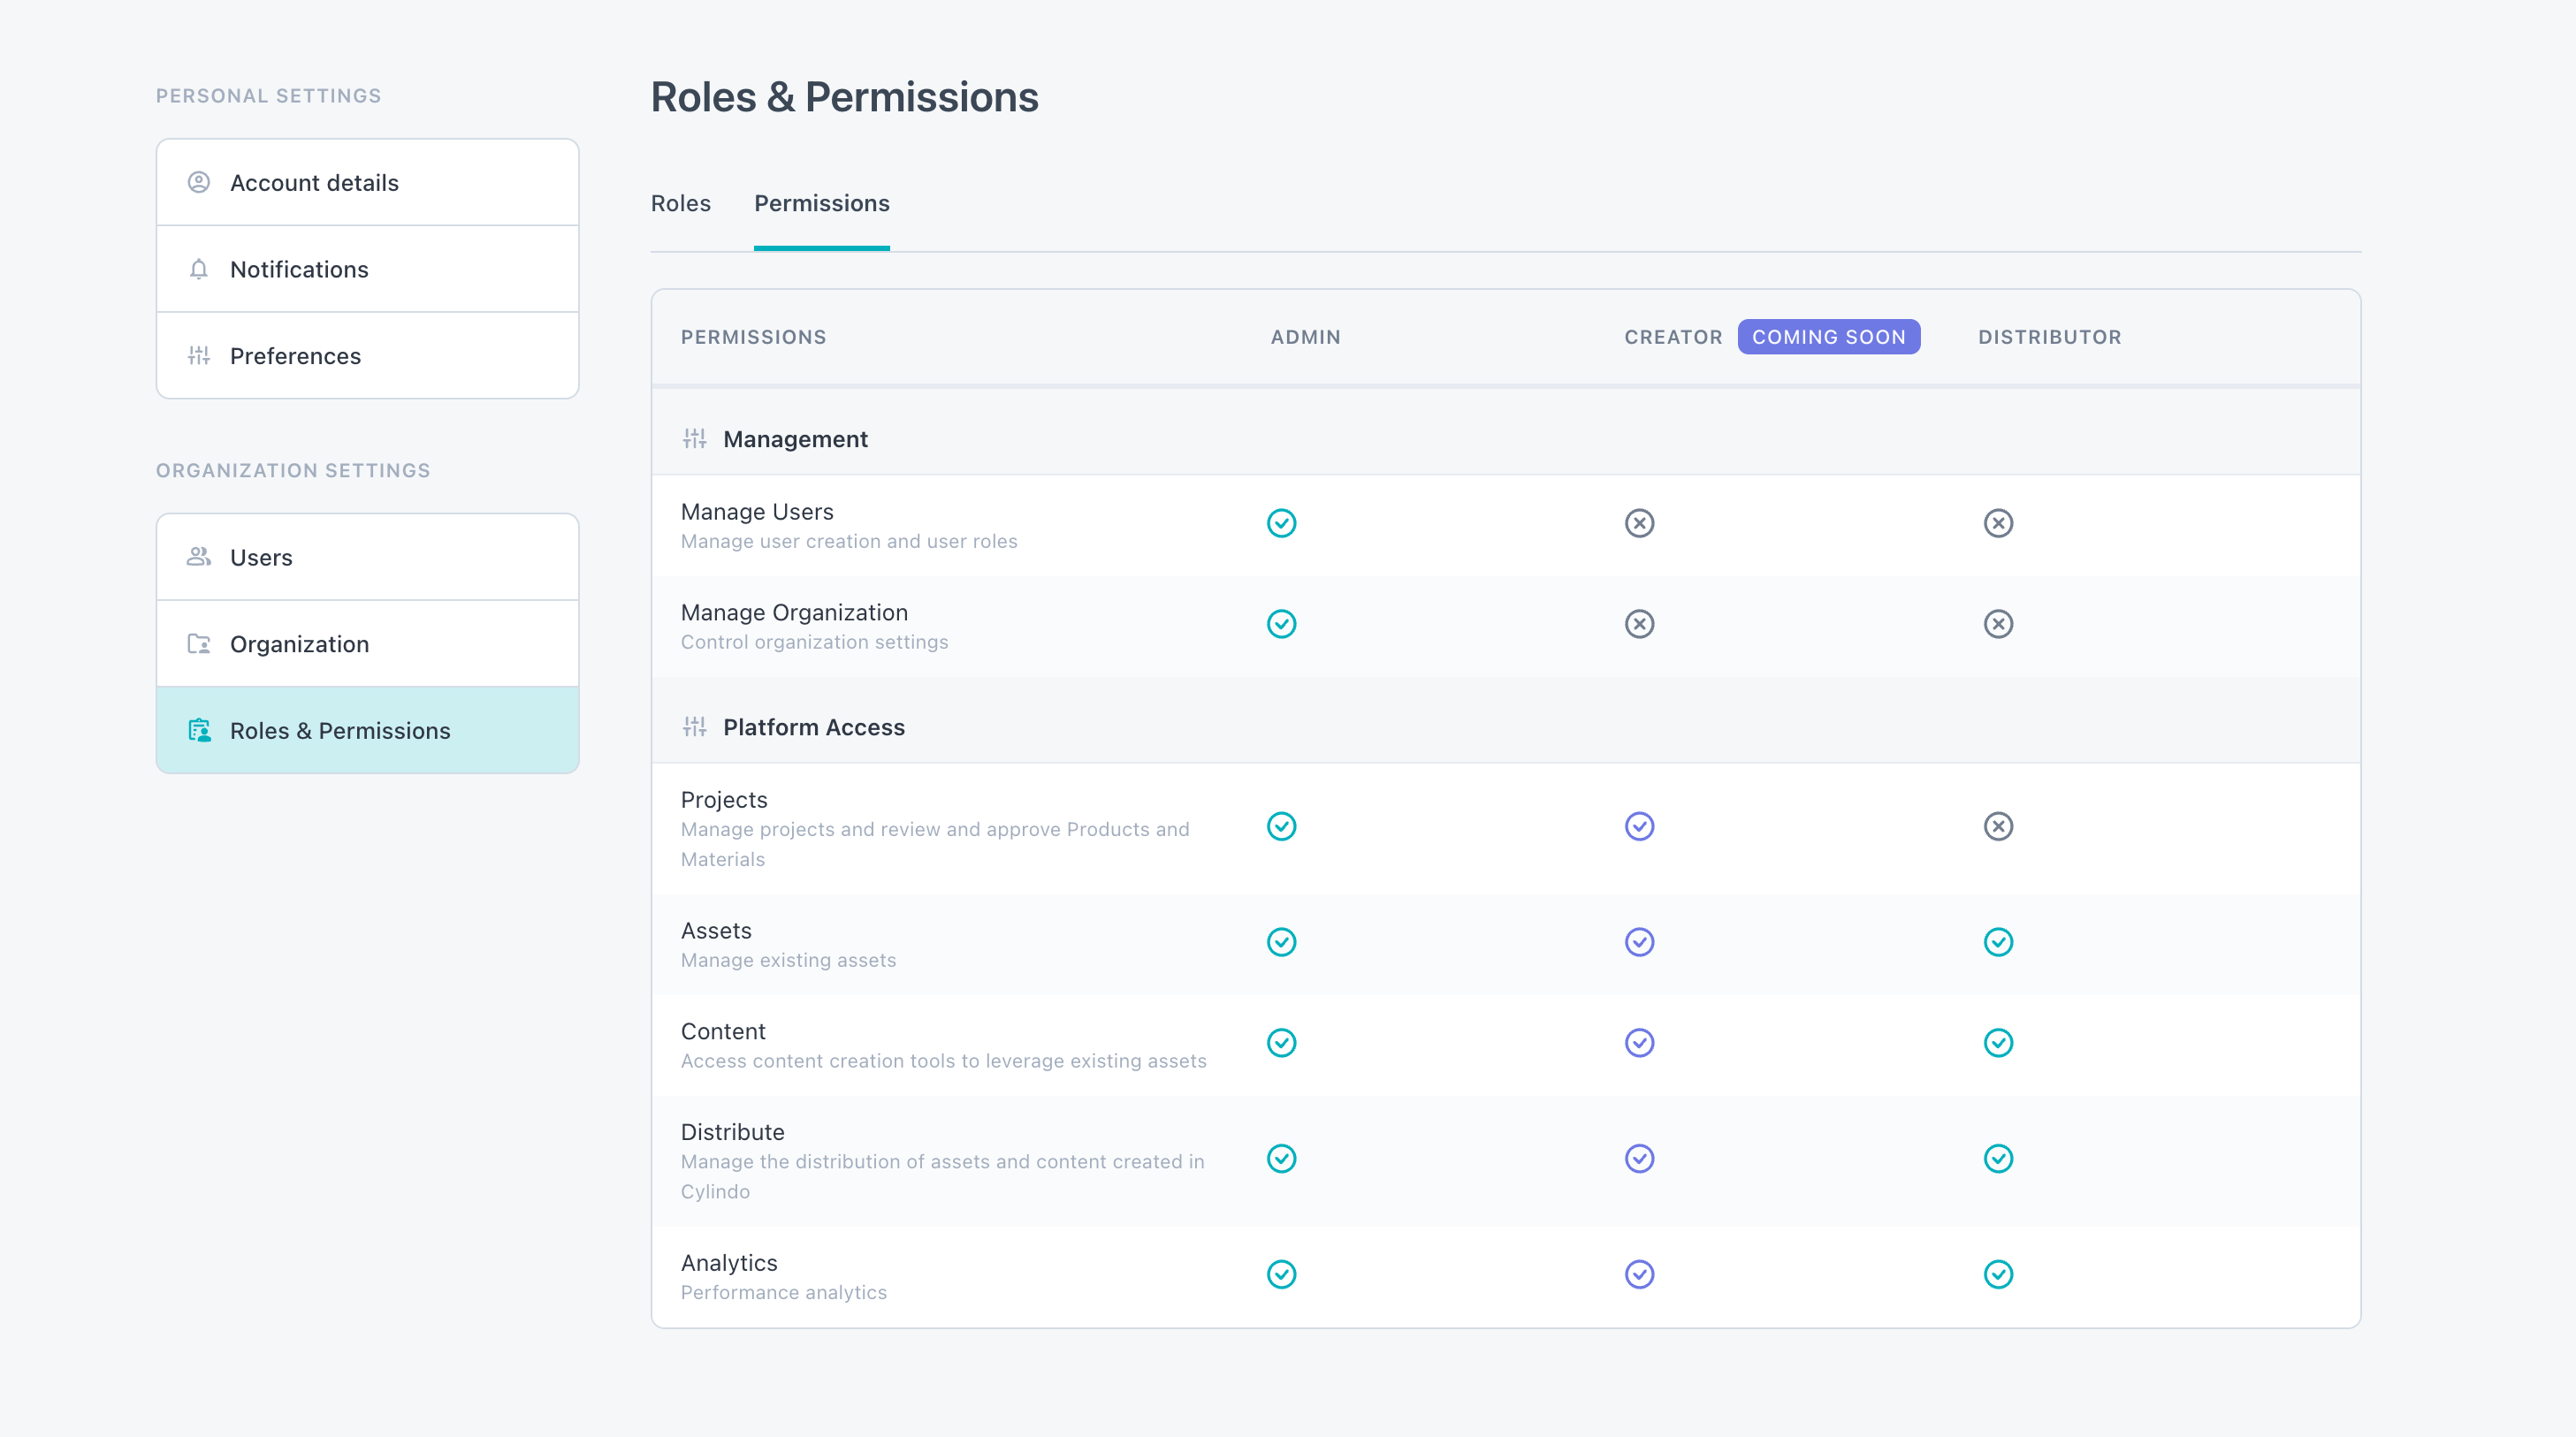
The Creator Role is the latest role-based permission feature for Cylindo users!
Moving forward, there will be three types of user roles within the system with various permission settings:
Why it Matters?
Where the Distributor role, introduced previously, allowed administrators to limit the access of certain users from viewing the asset creation workflows, this new role will be able to access all platform workflows.
This is particularly useful for customers working with:
Internal Teams: Limit users like marketing teams to focus on content creation and distribution with the Distributor role. Or, allow access to the expanded platform for those who also need access to the asset creation process.
External Partners: Restrict agencies or integration partners to content creation and usage, preventing access to projects or approval workflows.
How it works?
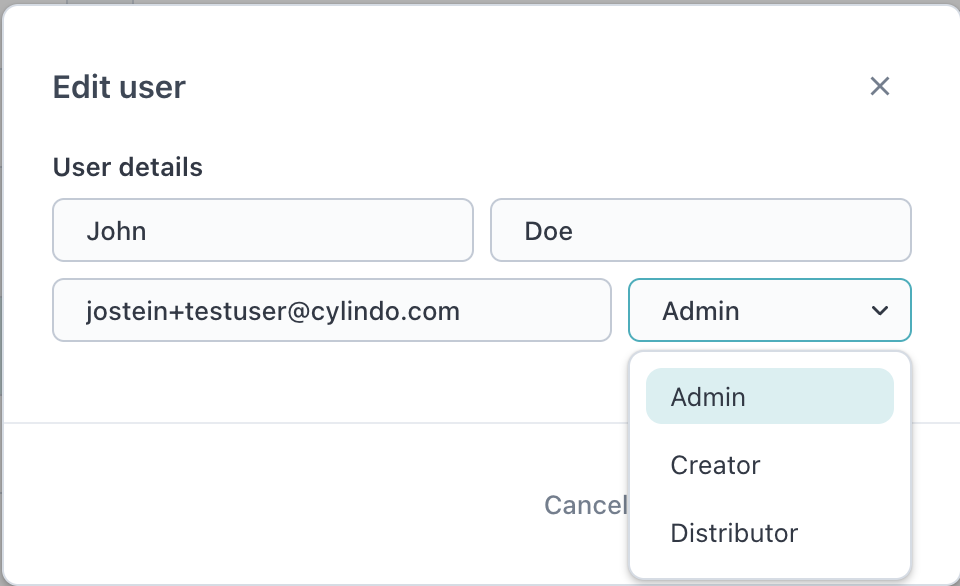
When inviting new users, Admins can specify the user’s role at the time of invitation:

To update a user's role, follow these steps:
The management of user roles is done by your organization’s Admin.
Click the ‘Settings’ button at the top right of your screen.
Maneuver from the ‘Settings’ tab to the ‘Users’ tab.
Admins can manage existing roles from the user settings.
Find the user you wish to update and select the ‘…’ next to their name.
Choose ‘Edit user’ and a modal will appear with the new dropdown setting.
Select either "Admin", "Distributor", or "Creator"
For more, check out the Learning Center here.
December 18th, 2024
New
What is it?
The Distributor Role is the first role-based permission feature for Cylindo users, allowing you to limit access to asset creation workflows.
Why it Matters?
Managing user permissions is critical for streamlining workflows and maintaining control over asset management. The Distributor Role helps restrict specific users from accessing asset creation workflows.
This is particularly useful for customers working with:
Internal Teams: Limit roles like marketing teams to focus on content creation and distribution.
External Partners: Restrict agencies or integration partners to content creation and usage, preventing access to projects or approval workflows.
How it Works?
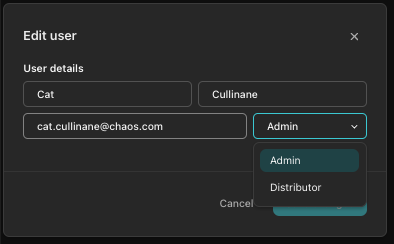
The management of user roles is done by your organization’s Admin.
Note: All current users remain Admins by default on release to ensure no disruption to current workflows.
Click the ‘Settings’ button at the top right of your screen.
Maneuver from the ‘Settings’ tab to the ‘Users’ tab.
Admins can manage existing roles from the user settings.
Find the user you wish to update and select the ‘…’ next to their name.
Choose ‘Edit user’ and a modal will appear with the new dropdown setting.
Switch the user from ‘Admin’ to ‘Distributor’ and save your changes.
When inviting new users, Admins can now specify the user’s role as Distributor at the time of invitation.
December 18th, 2024
New
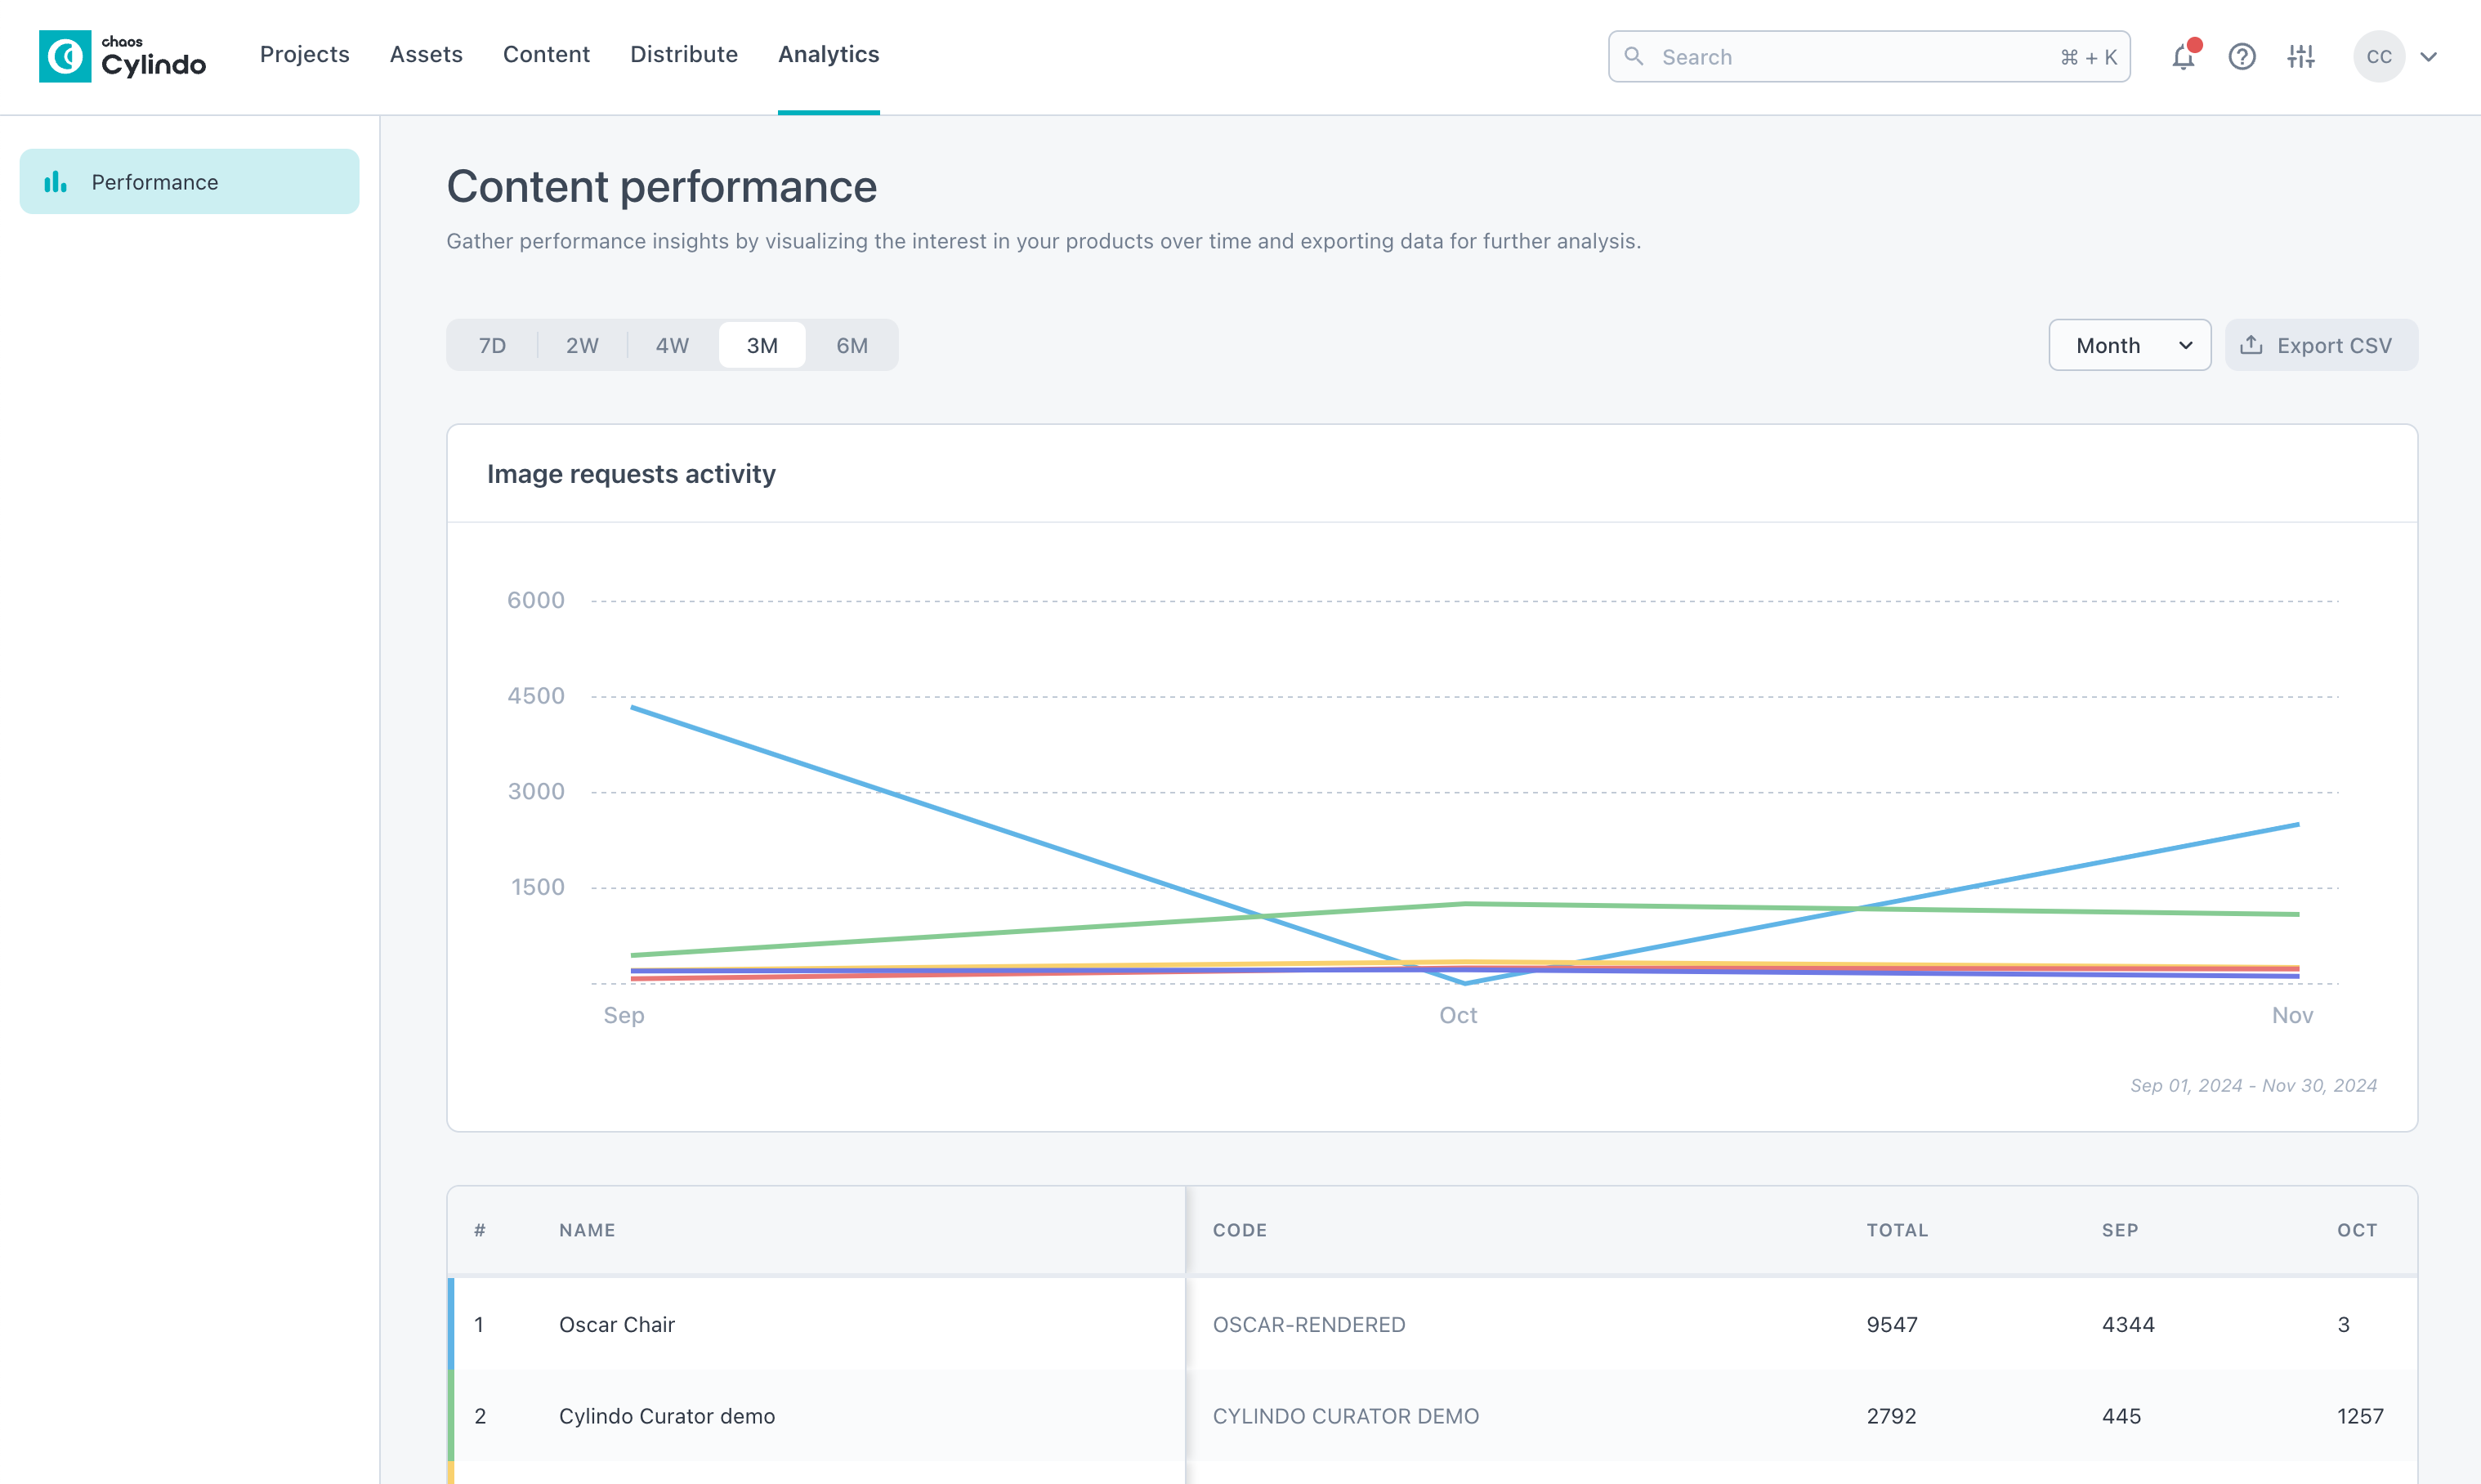
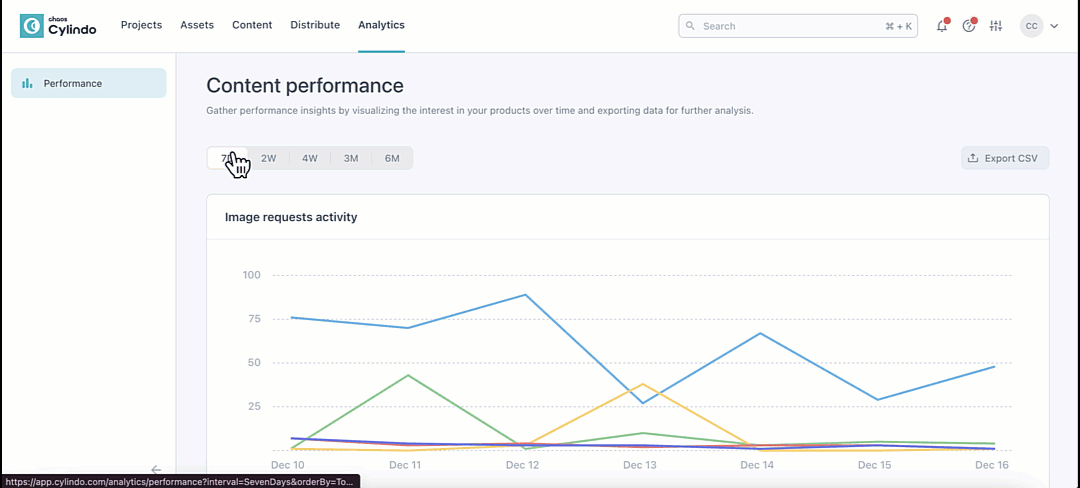
What is it?
The new Analytics page provides a dedicated place to access detailed insights into how your Cylindo content—like 360 HD and Studio Lifestyle images—is performing. By tracking metrics such as image views, user interactions, and product configurations, this feature helps you measure the impact and effectiveness of your visual content.
Why it Matters?
Understanding the performance of your content is critical for making informed decisions. With this new feature, you can:
Boost Engagement: Identify top-performing content and configurations to optimize customer experiences.
Streamline Strategy: Leverage data to refine your visual content strategy.
Gain Flexibility: Tailor performance visualizations with adjustable time ranges and data groupings.
These analytics empower you to focus on what resonates most with your audience.
How it Works?
Access performance data for content served via the Content API and 360 HD Viewer.
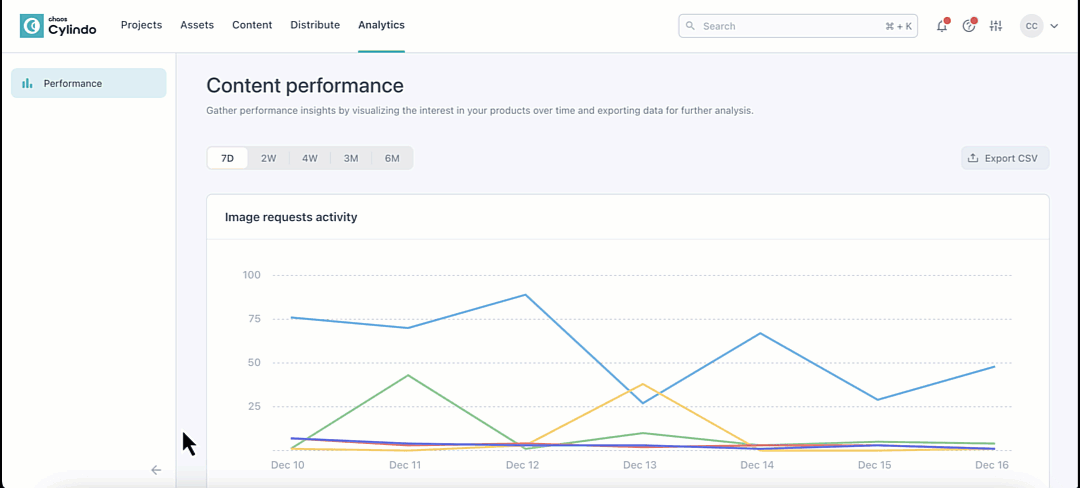
Use time range filters (7 days to 6 months) to select the date range you would like to analyze. Choose to group the data by month, week, or day for tailored insights.
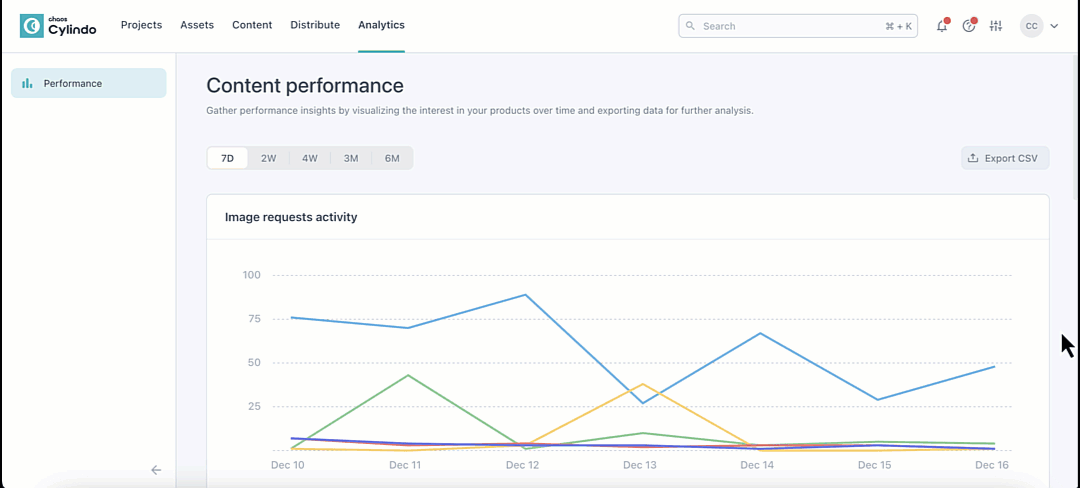
See a breakdown of the total number of images served for each product. Scroll to the right on the table to see a daily, weekly, or monthly breakdown of images served for that product.
Click on links in the data table to explore detailed analytics for individual products.
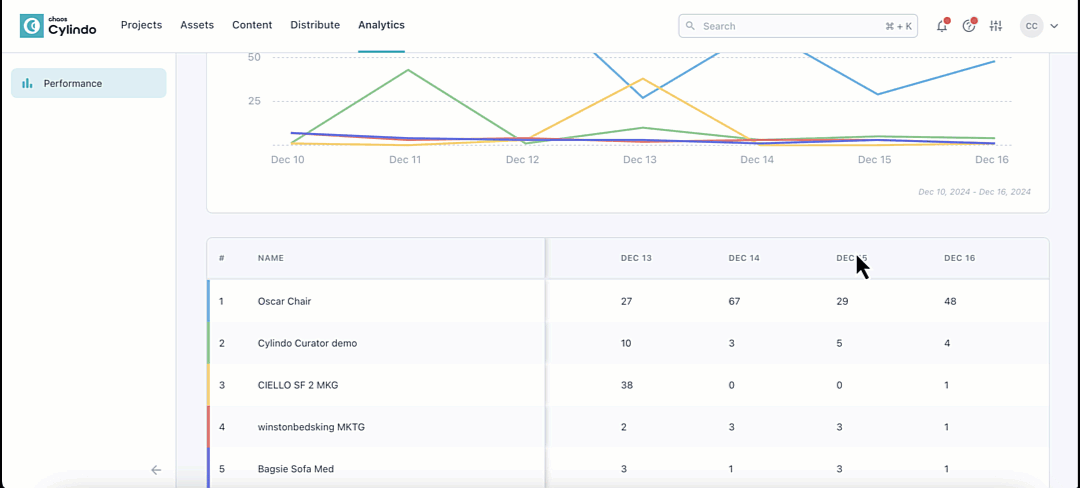
Configurations: Track unique combinations of geometries and materials served.
Unique Users: See how many distinct IP addresses interacted with your content.
Zoomed Images: Monitor the number of high-resolution (2K/4K) images served, both within and outside the viewer context.
Top Configurations: Identify the most frequently selected product configurations, including default views.
December 18th, 2024
Improved
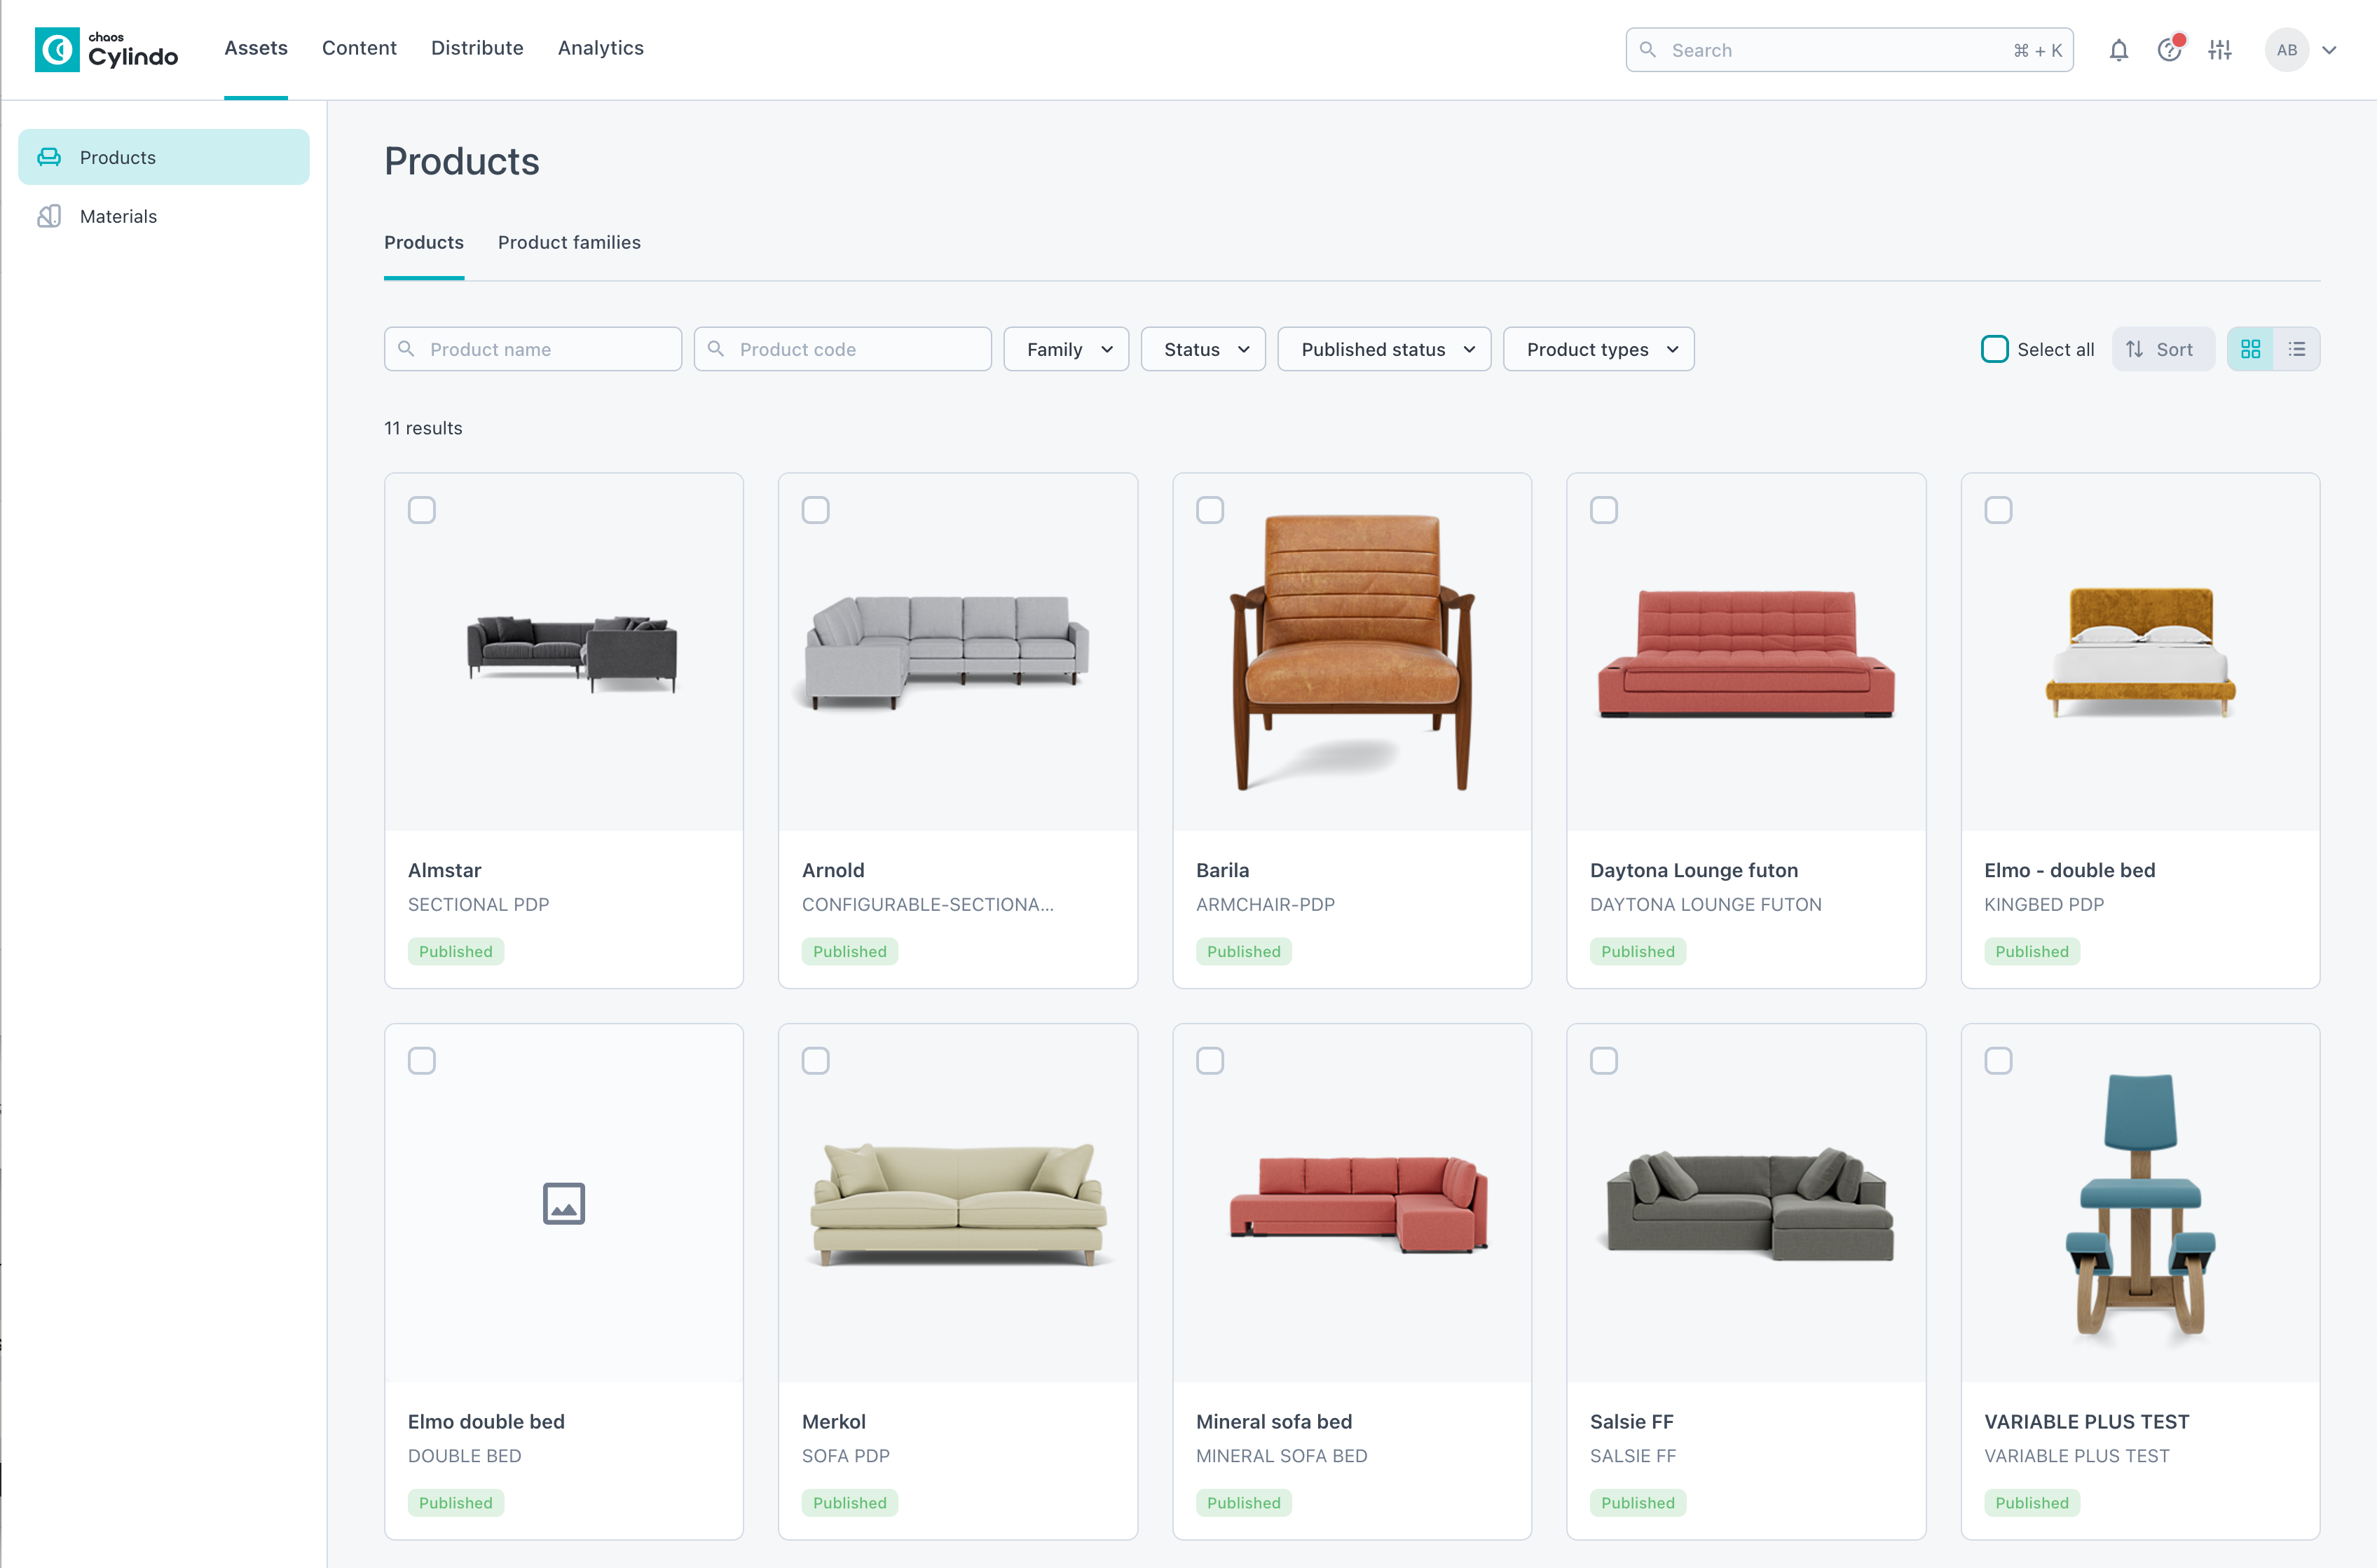
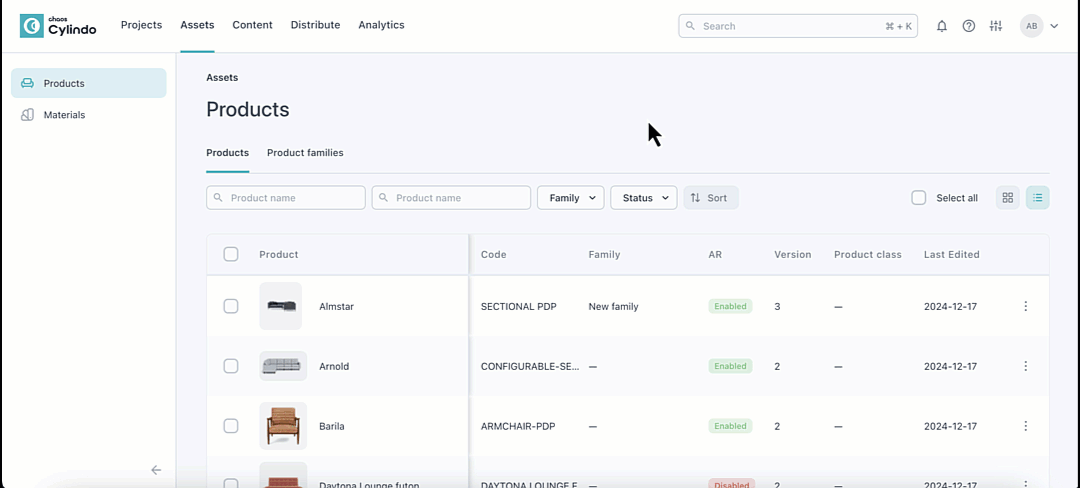
What is it?
The newly updated Product Overview Page provides enhanced functionality and a more user-friendly interface for managing and editing product data — from streamlined search and filtering to new editing capabilities.
Why it Matters?
Efficient product management is essential for keeping workflows smooth and organized. These updates are aimed at making it easier to manage your products and maintain accuracy across your data to help you save time, increase control, and improve overall usability.
How it Works?
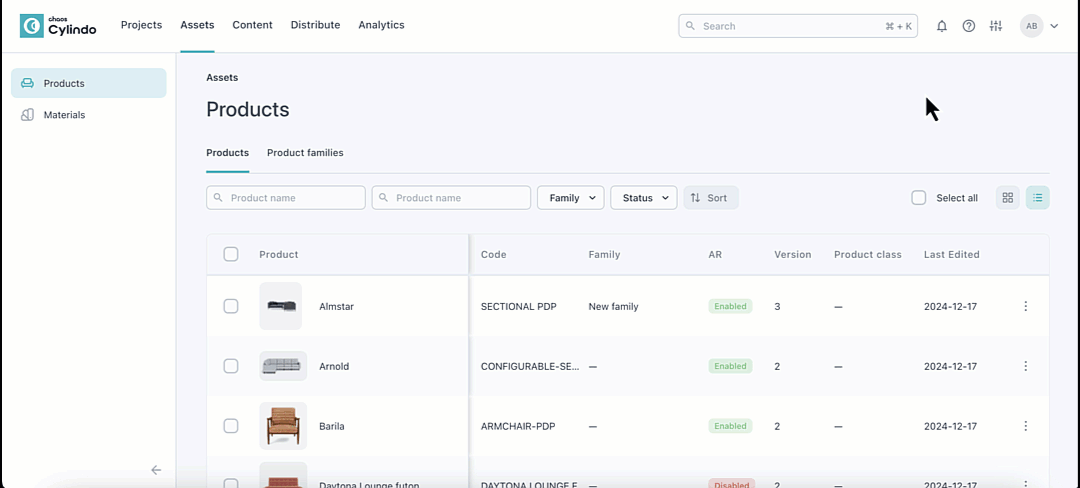
Locate the Product list page under ‘Assets’ in the top navigation.
Choose between the ‘Products’ or ‘Product Families’ tab.'

Toggle between grid and list views to suit your preference.'
List view — Key product details like name, code, family, AR (enabled/disabled), version, Product class, and last edited date are displayed.
Grid view — A high level overview including the name, code, and status of the product is displayed.
Search by product name, code, family, and status (active/disabled).
Sort results by name, family, or last modified date.
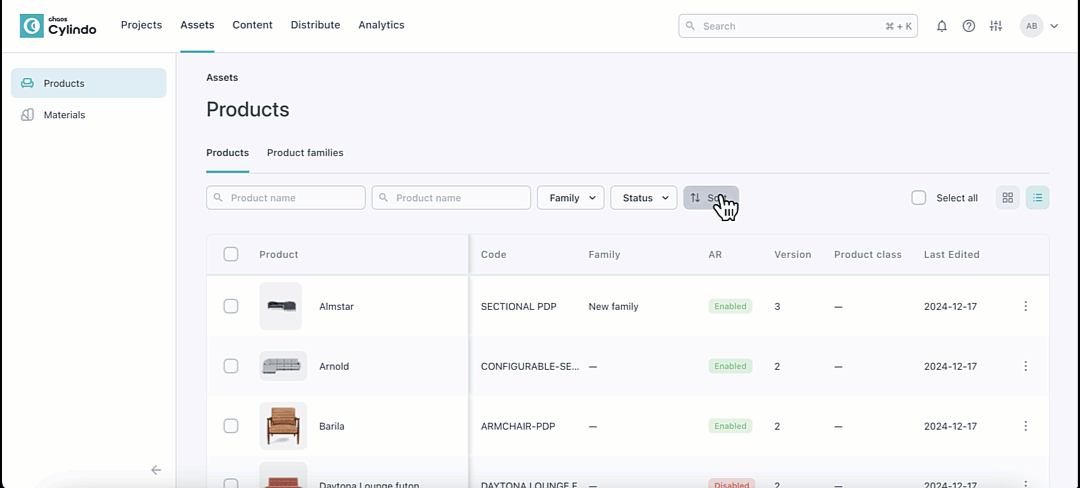
Select products to export CSVs or update families.
December 12th, 2024
Improved
What is it?
The Mass Production Readiness feature is a tool designed to help you ensure that all materials required for a product's mass production are finalized and approved. It provides clear visibility into material dependencies, making it easier to prepare project items for large-scale manufacturing.
Why it Matters
Mass production requires precision and preparation. Missing or unapproved materials can delay production schedules and increase costs. With this feature, you can:
Streamline production workflows by identifying material gaps early.
Ensure accuracy by categorizing and managing dependencies effectively.
Save time and resources by addressing issues before they impact mass production timelines.
How it Works
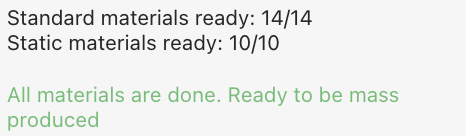
Check the Status:
Look for the ‘mass production readiness’ column on project items in the Production state.
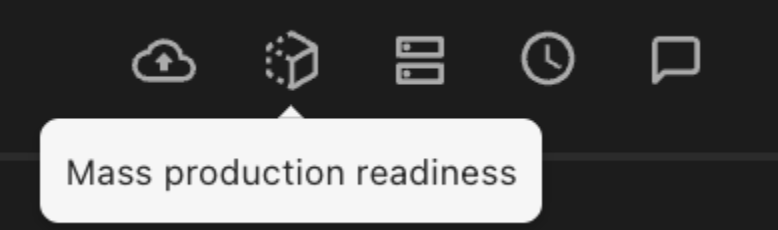
Indicators will display:
Green Check: All materials are approved and ready for mass production.
Yellow Warning: Some materials still require approval.
Hover for Details:
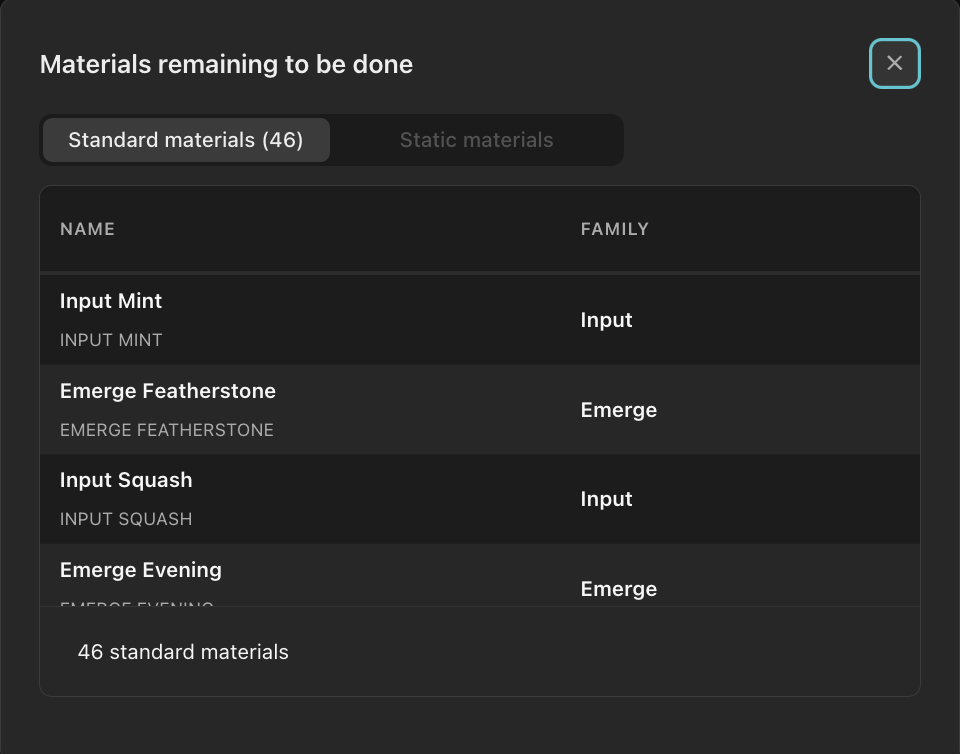
Hover over or click the icon to view a breakdown of missing materials:
Standard Materials: Used in features (e.g., fabric in an upholstery feature).
Static Materials: Applied to the model's mesh but not linked to features (e.g., The leg protector material in a cabinet).

Finalize Materials:
Click "Show Remaining Materials" to see a dialog box with details about the pending materials.
Click each material within the dialog box to be taken to the material review page for approval.
Resolve each to mark the asset as ready for mass production.
Confirmation:
When all materials are ready, you’ll see a confirmation message, signaling that the item is production-ready.
October 11th, 2024
New
We strive to improve our portal and tooling continuously to enable you to create stunning visuals, organize your assets, and make distribution as seamless as possible.
To ensure that we build / improve the right things, we need your feedback.
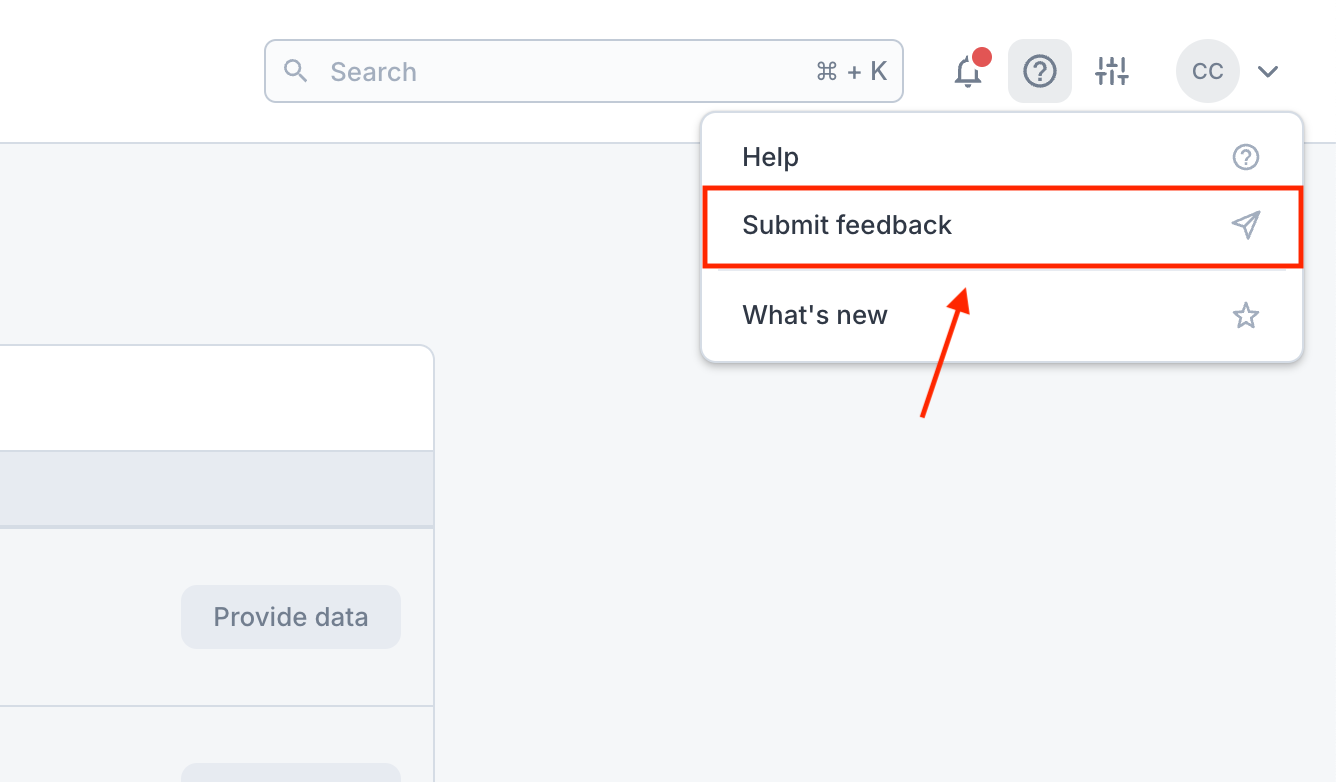
If you have any comments or suggestions about our portal overall or specific parts of it e.g. Studio or Dimension shots, you can now submit feedback from within the portal.
To do so, simply select ‘submit feedback’ from the help menu.
Thanks in advance! 🙏